Slider

Moms morning self-care routine

Friday, November 11, 2016

I''ve built a platform based on being strong, practicing kindness, spreading love, and building confidence. But since this election i've been trying to figure out how I feel. 
I've been emotionally depleted for the past few days. I've been feeling angry, hurt, paranoid, and betrayed. I've been feeling like i'm surrounded by people who expect me to "get over it",or people who make jokes about it, or people who don't understand why i'm so emotionally invested in it and my anxiety has been through the roof.
As a multi-racial black woman in a relationship with a mexican, raising a multi-racial black daughter, I worry. I worry not only for myself, but for the mental and physical safety of my child, my partner, and our families. 
I've been worrying....but then I remember what I stand for; kindness, strength, love, confidence. I remember who I am, who is looking up to me, who i'm inspiring, and I force myself to push forward. Not only for me but for my family and for the young women that write me looking for guidance, I need them to always feel secure and that can't happen if i'm falling apart. 
So how do I, as a mother with 9 million other things on my plate, find time to put my self-care first? 

I set a routine. I know a lot of us moms think that we don't have time or when we do have the time, we could be getting other "more important" things done with that time. To that I say, making time for yourself IS the most important thing. 

I want to share with you all a quick rundown of my morning self-care routine.

1. WAKE UP EARLIER: I generally need to be up at 7:30 to get Jordyn up for school. I tend to wake myself up 30-45 minutes earlier than that so I can have some alone time. It's also really important to be aware of the sounds you have around you while waking up. Some people prefer silence, some prefer music. My alarms are set to a soft bird chirping so it sounds like i'm waking up to birds outside my window, which is calming for me. Experiment with what sounds you enjoy and dislike. 

2 HYDRATE: Our bodies just went 8 hours without water, we need to hydrate. ( nothing too cold, as it can shock your system just waking up) I generally keep water by my bedside and reach over for it first thing in the mornings.

3. INDULGE: Coffee is what I look forward to in the mornings, I like to buy the best ingredients for my coffee, drink out of cups that make me happy, and really enjoy and indulge in it. Whatever your morning indulgence is, whether its smoothies, juices, bagels, tea, go for it. Having something you look forward to in the mornings can work wonder for your moods. 

4. MORNING READS: I like to put myself in a good mood and remind myself of the things I have to be grateful for by reading daily affirmations. I'm currently reading daily inspirations from Your Best Life Begins Each Morning: Devotions To Start Every Day Of The Year By Joel Osteen. 

5. YOGA & MEDITATION: One of the biggest reasons I wake up earlier than Jordyn in the mornings is so that I have time to meditate before the hustle and bustle of the day. A quick stretch and some positive affirmations in the morning are serious mood boosters.

What you don't do in the mornings is just as important as what you do, so here are a few of the things I avoid before i've taken care of myself.

1.MY PHONE: There is no benefit to waking up and scrolling the gram, Facebook, or snapchat. If anything, it'll give you anxiety or FOMO ( fear of missing out) It's so easy to fall into the rabbit hole of social media only to look up and wonder where the time went. 

2.EMAILS: Looking at work emails outside of my designated "work email" time can cause anxiety for me and once my anxiety strikes, its there to stay all day, so I wait to read emails until after i've set my tone for the day. 

3. TV: Tv is a huge time consumer. One minute you're watching the news, next thing you know its been 4 hours and your watching Judge Mathis ask someone how much drugs he's on in his courtroom. Its something I try to avoid first thing in the morning. 

And thats my morning self-care routine. Its quick and simple and to the point. it leaves me refreshed, balanced and energized before I have to get the kiddo up for school.

Xo, Jeanice :)

First impressions: Eden Bodyworks Kids line.

Tuesday, November 8, 2016


I recently received the EdenBodyWorks Eden Kids line to try out and first things first, let me say this...I LOVE THE SMELL OF THESE PRODUCTS!
Like....LOVE!! All the products have a very soft, subtle strawberry cotton candy like scent thats absolutely delicious. 

If you aren't familiar with Eden BodyWorks they are a natural hair company that stands behind the statement that they "provide natural products that integrate wellness and beauty inspired by nature to restore and maintain the hair and bodys original design."


I've used the products a few times and i've got to say, I think they're kind of great. Definitely perfect for kids hair. 
The Berry Natural Detangling Shampoo is a very gentle cleanser but it gets the job done. A little bit goes a long way and I noticed that its also not very drying which is a huge plus! I don't typically detangle while shampoo is in Jordyns hair so I can't comment on the detangling properties but I can say her hair was a lot softer after shampooing than it normally is. 
The shampoo is free of sulfates and parabens and is cruelty free!!

The Berry Natural Leave-in Detangler didn't really do much, it softened her hair a little bit but outside of that, there wasn't much of a wow factor for me. I can't really say whether or not it helped with detangling because I typically detangle with conditioner in but I feel like this would be good to hep refresh dry hair on those restyling days. 
Again, the product is free of sulfates, parabens, and is cruelty free!

The Berry Natural Moisture Milk is my favorite product fro this line!
It's very lightweight but extremely moisturizing! I noticed that the amount of frizz in Jordyns hair was greatly reduced and her hair retained a lot more moisture. It's light enough to use as a daily moisturizer without fear of build up. 
I absolutely LOVE this hair milk. Its one of my favorites and I highly recommend it!

The Berry Natural Curly Creme is a STYLER not a moisturizer. So, if you're using this product thinking its going to add moisture, it won't. I use this on top of the Moisture milk and it is amazing. The perfect light weight styler. Its great at taming those annoying flyaway hairs and adds a ton of shine!! 

The Berry Natural Smoothing Gel is really great. It is A LOT thicker than what I normally expect from a gel and the consistency is almost jelly-custard like?...not runny like most gels. It gives a great hold without making the hair hard to the touch. 
It is really thick  and I wouldn't recommend using it daily but I could definitely see this giving a lasting hold all week if you re-spray it with the detangling spray. This would probably give great results on a twist out!!
Overall my first impressions with these products are really good. I'm going to continue to try them out and maybe try a twist out with the gel and let you all know how they work! 
Have you all tried any of these products? Let me know on IG how they worked for you!


Xo, Jeanice :)

* These products were provided by Eden BodyWorks however all opinions are my own. 

Natural kids protective styles: Faux Loc Crotchet Braids

Thursday, November 3, 2016


Jordyn is a huge fan of her curls. She's not however, a huge fan of me doing her hair all the time and honestly, its hard balancing time for hair, school, home life, extra curricular activities, and work. Thats why this school year we've been LOVING protective styles. Particularly, crotchet braids because they are SO simple and SO fast! And I mean come on, look how cute they are!

I did these faux loss over 2 days. On day one I cleansed and moisturized Jordyns hair using the Eden Bodyworks Eden Kids Line ( I will be doing a more in depth review on these products when I get a chance to try them all!)
I used the Berry Natural Detangling shampoo and added moisture with the Berry Natural Moisture Milk + Berry Natural Leave-in Detangler ( both smell absolutely AMAZING!)

I detangled and pulled her hair into 2 low buns for school which allowed the hair to air-dry and stretch  a bit so that her curls weren't so tight while I was braiding. 

I used a straight back braiding pattern because i'm not the best braider. ugh...I wish. lol. 
I actually referenced this Youtube video for a braiding pattern and then tweaked it a bit for Jordyns longer hair and my minimal braiding skills)
 
On her scalp I used Just For Me Hair Milk Soothing Scalp Balm to keep her scalp moisturized and prevent it from getting to dry. 


The hair itself was purchased from The Beauty Supply Warehouse and is the Zury Kids Genie Loc hair. I paid 3.99 a pack and used 6 packs.
 I love this hair. Its super soft and lightweight. It also comes with adorable loc jewels.
I always make sure to let my hair soak in a apple cider vinegar/water bath to pull out any chemicals that may cause itching or irritation at the scalp....do this the night before so the hair is dry when its time to install it. 
The install, including braiding, took about an hour and fifteen minutes which is amazing!


 Her last crotchet braids lasted about 2 and a half weeks, these will probably hold up for the same amount of time. 

Jordyn and I both love her new faux locs, let me know if you decide to try any crotchet styles on your little ones!

Xo, Jeanice :)


Tween Fall fashion: Florals

Friday, October 28, 2016


Fall has been taking its sweet time to make an appearance here in good ol Las Vegas. Thankfully, its starting to cool down and we can pull out all the cute fall clothing! 
From the warm tones of burgundy and olive to the moto jackets and plaids...fall is my FAVORITE time of year. I adore all the trends but I think fall florals are my absolute favorite. 

I'm especially loving this gorgeous floral print from Crazy8 
Crazy8 is a children's clothing brand that makes fun, fashion-forward, age appropriate clothes for children 6months to 14 years. 

I'm a huge fan of AGE APPROPRIATE clothing. I can't tell you what goes through the minds of some of these parents when they are dressing their children...I see pictures and the sweet kids just look so uncomfortable and way too grown! 
PSA: LET THEM BE LITTLE! kids can look cute and stylish and still look like kids!


Crazy8 is incredibly easy to shop and celebrates the unique individuality of every kid with the type of clothes and accessories that are easy to dress up, dress down, and make their own. 

 In addition to be super cute and kid friendly, the clothing is extremely well made! 
This gorgeous floral dress is so soft, and the riding boots are extremely sturdy and will definitely stand up against how rough Jordyn is. 
Ha!

Florals, riding boots, and denim jackets are going to be our go-tos this fall....not to mention, we LOVE a cute hair accessory and this gold bow gives us all the happy feels! 

Be sure to check out all the cute styles at Crazy8 and let me know your favorites!

GIVEAWAY!:
 enter for a chance to win 50 dollars to Crazy8 on my instagram!
HOW TO ENTER:
Follow @Jeanicewebb and Crazy8
Like the below photo of Jordyn rocking her fall florals
 & comment your favorite fall trend!
Winner will be chosen November 4th!

*This post is sponsored by Crazy8 However, all opinions are my own. 

Natural Hair Halloween Costumes!

Thursday, October 27, 2016

We LOVE Halloween over here. It gives us a time to have fun and be creative however, those of us with natural hair know that we sometimes have to think outside of the box when incorporating our kids favorite characters or bringing their costumes to life. So, I wanted to have a little #throwbackthursday fun and share with you all a few of Jordyns past costumes that are perfect for curly haired kiddos. 

Costume #1: "Tween wolf" 

This extremely simple DIY is MADE for curly kids, simply style their hair in a wash and go and bam!! hair is set!
FOR THE HAIR:
I used Miss Jessies Pillow Soft Curls which is one of our favorites for a achieving soft, touchable, fluffy, yet defined wash and go. 

FOR THE COSTUME YOU'LL NEED:
Faux fur - MICHAELS
Plaid shirt
Jeans
 ( and if you're using shorts like I did, leggings or tights)
plastic headband -Michaels
Cardstock
Hot glue
safety pin.
makeup, if you desire.

WHAT YOU DO:
Hot glue fur to the inside of the shirt & to the wrist area. 
Cut holes in leggings ( or jeans) and hot glue pieces of fur to the insides of the holes.
For the tail: wrap the fur into itself diagonally, going into a point...use hot glue to secure it together. 
Attach a safety pin to the end of the tail and then attach it to the back of your jeans.
For the ears: cut card stock in the shape of ears..Cut fur into the same shape.
 Cover both the front and back of the ears and use hot glue to secure to the plastic headband. 
For the makeup: I used  E.L.F brown and black eyeliner and red lipstick to give Jordyn a simple, wolf look. 

Costume #2: Madeline Hatter ( or, your childs favorite princess)

This costume is semi-DIY since the costume itself is store bought. The accessories and hair are all simple DIYs.

FOR THE HAIR:
When your kiddos want to be princess or fairy tale characters that have hair that isn't their natural color, we have to get creative. Those colored hair sprays are cool but the MESS!..ugh...Try buying colored yarn or marley hair and twisting it into your kids hair like I did here with Jordyns. 
We just did regular twists throughout her head and incorporated purple and blue hair to match her character. It was SO cute!! 
For the twists we used Cantu For Kids Styling Custard which gave it a nice, soft hold. 

I'm a big believer that accessories MAKE the costume...especially a store bought one. The hat that came with this costume was....less than desirable so, I made a new one. 

 FOR THE HAT YOU'LL NEED:
glitter craft foam and plastic headband- MICHAELS
Feather and tulle- MICHAELS
scrapbook paper and paper bow- MICHAELS
Little pet shop mouse- Jordyns room. ha!
hot glue gun.

WHAT YOU DO:
Roll the craft foam into a tube like shape and hot glue to secure.
Cut out a small circle of craft foam to cover the top. Hot glue to secure.
Cut a bigger circle to act as the bottom of the hat and hot glue to tube shape to that bottom piece to secure. 
Cut a thin strip of scrapbook paper and wrap around the base of the hat. Hot glue to secure.
Hot glue your bow to the front.
Use the hot glue to attach the tulle, feather, and plastic mouse to the side of the hat 
Hot glue your hat to the plastic headband. 

So  now you've got your hair and accessories done right...but lets not ruin our perfect costume with a bright orange trick or treat pumpkin. Lets turn our pumpkin into part of the our costume!

FOR THE TEAPOT YOU'LL NEED:
plastic orange pumpkin
craft paint in teal and gold-MICHAEL
Glitter gold balls-Hobby Lobby
cardboard.
hot glue gun.

WHAT YOU DO:
paint a few coats of gold and teal stripes on your pumpkin. 
Allow to dry in between each coat.
Cut out a handle and spout shape from your cardboard and paint a few coats of gold over them
Allow to dry between each coat. 
Hot glue your glitter balls to the rim of your pumpkin.
hot glue your handle and spout to the sides of your pumpkin.

I finished up her look with some simple makeup. A quick swipe of Rose D'Oro blush and Brilliant Shine lipgloss in Rose Blush both from MILANI


Costume #3: Medusa

This was one of my favorites and was a huge hit at Jordyns fall festival. 

FOR THE HAIR:
 I did a twist out pulled into a high pony with bangs. 
I used Curls Blueberry Bliss Curl Control Jelly to give me a defined twist out. 
I then used a temporary colored hair spray I picked up from Walgreens to spray the hair green.

FOR THE DRESS YOU'LL NEED:
A white pillow case.
Gold decorative ribbon & trim- MICHAELS
Hot glue gun.

WHAT YOU DO:
Ok, this is literally SO simple!! 
Cut arm holes and a neck hole through the closed end of the pillow case
Hot glue some ribbon and trim and viola..you have your dress!
SIDENOTE: be sure to have your kiddo wear clothing under the pillow case as it literally is a pillow case and is thin and kind of see through. lol. Jordyn had on shorts and a tank top on. 

FOR THE SNAKES YOU'LL NEED:
Rubber snakes small and large- DOLLAR TREE
small hair clips and a million bobby pins-SALLYS
Gold and green craft paint and gold glitter- MICHAELS

WHAT YOU DO:
Paint your snakes green and gold, sprinkle on glitter while drying.
Once fully dried, hot glue hair clips to the back of the bigger snakes and clip into the hair.
Use bobby pins to attach the smaller snakes to the hair.

FOR THE BODY PAINT YOU'LL NEED:
Fishnet tights.
Green costume paint.
makeup sponge.

WHAT YOU DO:
Place the fishnets in the places you want to paint and sponge on green costume paint to make a scale like pattern. 

FOR THE LIPS & EYES:
I used gold glitter cream eyeshadow and  E.L.F black eyeliner and red lipstick to complete the look!


Costume #4 "dead" Pikachu

WHAT YOU DO:
This costume was inspired by ElliMacssfx on Instagram! Here is her tutorial that we followed to create the pokeball!


WHAT YOU NEED:
Pikachu ears, tail, spirit gum, fake blood, and yellow tutu - PARTY CITY
Foam ball and craft paint- MICHAELS

FOR THE HAIR:
Individual crochet braids using Zury Hollywood Kids Havana twists
You can watch our individual crochet braid video here

I hope these give you some inspiration for your little ones costumes this year! 
Cant wait to see them all, please be sure to tag me in them!

Xo, Jeanice :)

DIY erasers

Friday, August 19, 2016


Happy #DIYFRIDAY !

We ( I...ME..Jordyn and Zeke are doing nothing..)  are so busy with back to school prep but I want to share a quick DIY with you guys! These DIY eraser are so fun and easy to make. Jordyn had a blast and she's so excited to take these to school and use them. 

Like I said, these are pretty quick to whip up so lets get started!


WHAT YOU NEED:
Sculpey eraser clay ( I got mine from Michaels)
baking sheet
WHAT YOU DO:
1: preheat oven to 250 degrees
2: Break off pieces of eraser clay in your desired colors and form the shapes you want. 
3: place on a baking sheet and bake as instructed on package. ( 20 mins.)
4: Let cool completely before use.

Thats it!...SO easy. Ours turned out great but here is a few tips to help yours turn out a little better:

1: When mixing colors, fold colors in gently and don't knead too much, the dominant color will take over and instead of a blended look, you'll end up with one flat color. 
2: The package says to bake for 20 mins but ours are a little hard, I suggest checking your erasers around the 15 minute mark. 
3: Glitter is not included so if you want a little sparkle, you'll have to add your own. 

This is such a quick and easy back to school craft!

Xo, Jeanice :)

5 ways to encourage a love of learning in your child

Wednesday, August 17, 2016


Back to school is right around the corner and as parents we're all doing our happy dances and daydreaming about all the quiet, alone time we're going to have....meanwhile, the kids are all trying to figure out ways to fake sick for the next few months to avoid going back.
*cough, cough..mom I have a fever in my big toe, I can't go to school today.*

Truth is, children are naturally curious and love to learn, thats why they tend to bug us asking 10000000 questions a day. However, as they grow older, if that curiosity and love of learning isn't fed, it starts to fade and eventually burns out. As our children's first teachers and role models, it's important that we foster our children's love of learning both at home and in academic settings early on so that when they get older, it sticks with them.
 Here are 4 ways I encourage a continuous love of learning in my daughter!

1: I FIGURED OUT HER LEARNING STYLE.
This is probably the biggest thing.
Every child learns differently, there is no one size fits all to learning so figuring out how your child learns best will help you figure out how to teach them. Theres a variety of different learning styles from verbal, physical, and logical, to social, solitary, and visual. Study your child, figure out in what setting they learn best and go from there. Jordyn is a creative, so she's a very physical learner. She learns best with hands on activities and crafts so I make sure to provide lots of those opportunities.

2: I CREATE A HOME THAT ENCOURAGES LEARNING.
Learning begins at home so I make sure to create an environment that encourages Jordyn to constantly learn. I make sure we do activities or create crafts that are aligned with her interest, I stock her bookshelf with things I know she will read, I keep her artwork and things she's created on display, we even try to watch shows aligned with her interest. I make her interest my interest and try to keep our home as encouraging as possible.

3: I MAKE LEARNING FUN.
We know by now that children tend to learn more when they're having fun. When children are enjoying themselves they're more engaged in the learning process so I try to always make things fun and interesting for Jordyn. Playing games, doing crafts, going on field trips, and exploring new places   related to her interest are a few ways I make learning fun for her. I try to teach her that learning, even in the most fun ways, is motivating and rewarding.

4: I ENCOURAGE CURIOSITY
We all know that those "whys and hows?" can be annoying but I would rather my daughter ask too many questions than too few. I'd rather her stay curious than not be interested at all. We, as parents, play such a huge part of fostering and encouraging our children's curiosity so it's important that I  do my best to always encourage it. As hard as it may sometimes be, instead of giving vague answers to her questions I answer them as best I can. Added bonus, if I don't know the answer to something we look it up together and we both learn something!

5: I PAY ATTENTION TO WHEN SHE NEEDS A BREAK
I try to pay attention to times when Jordyn gets overwhelmed and frustrated and I encourage her to take breaks during homework if she needs. I don't jam pack her schedule with activities. I give her time to just be....to binge on tv...to play with no lesson behind it...to relax and just be.

The most important thing is that we, as parents, never let our love of learning fizzle out. We are never too old to learn something new and if our children see us excited about learning, they will be too! Get out there and learn something new today!

Xo, Jeanice.

Rosemary vinegar rinse for hair

Monday, August 15, 2016


As you all know, i've been protective styling my hair for almost the entire summer and while I love it, my scalp gets really dry and itchy resulting in me having dandruff from scratching. I starting doing a lot of research on what I could do to eliminate the dryness and I came across some information about using a rosemary tea rinse on your hair! 
I found through my research that rosemary is really one of the most beneficial herbs for your hair. In addition to containing anti-inflammatory and antimicrobial properties, which is great for reducing itchiness and dandruff, rosemary is also said to stimulate and improve circulation to the scalp which in turn, encourages hair growth. It is also great to improve shine and gently cleanse the hair. 
I came across multiple ways to create a rosemary hair rinse but the one I settled on contained apple cider vinegar. ACV rinses are really popular among the natural hair community because it is extremely clarifying and helps to remove build up without stripping the hair completely. ACV also helps to leave hair shiny, improve body and definition of curls, and stimulate the scalp. 

So, your armed with all your information and now you're ready to make your hair rinse, so lets get started!
WHAT YOU NEED:
Fresh rosemary. 
Apple Cider Vinegar. 
Water. 
Pot for boiling.
Container for storing your rinse. 

WHAT YOU DO:
1: Start by bringing a big pot of water to boil, how much water you use is up to you. I would recommend making a large batch and keeping the excess for future use. 

2: Add a couple bunches of your fresh rosemary and turn the boiling water down to a simmer. Let simmer for 20-30 minutes. ( Your house will fill with the most amazing rosemary scent...bonus!)

3: Turn your boiling water off and let cool completely, remove your rosemary and strain water into a bowl. 

4: Add 1-4 tablespoons of ACV per each 8 ounce of water you used and stir. Experiment to find what your hair likes best. Typically, dry hair likes less and oily hair likes more. 

5: Pour into a container that has a lid for storing. 

HOW TO USE?
I use this rinse about twice a week in the shower, since I don't wash my hair with my twists in I will rinse my hair in warm water and then pour the rosemary rinse through my hair and then let it air dry. I don't rinse it out, ( the vinegar smell will go away once dry and you'll be left with the most amazing rosemary scented hair.) 

If you're using this on your natural hair...cleanse your hair as normal and follow up with your rosemary rinse. Again, don't rinse out.

A FEW TIPS:
1:Store your rinse in a bottle with a squirt top, making it easier to squirt directly onto your scalp.
2:  Store your rinse in the refrigerator. While I love the feeling of the cold rinse on my scalp, some of you may not. If that's the case, either make your rinse right before you're about to use it or remove it from the fridge and let it come to room temp before taking a shower. 
3: Always make enough for multiple applications, that way you don't have more to make more each time you want to use it. 

Xo, Jeanice 


MINI HOMEWORK STATION

Friday, August 12, 2016

Happy #DIYFRIDAY

 How has everyones week been? We're crazy busy over here preparing for back to school. Is non-pregnancy nesting a thing? Because I think I have it. 
Seriously. All of a sudden i'm organizing everything.....Like, I have this crazy overwhelming desire to get my home prepared and organized. But, not for a baby...for the new school year. HA!
So, with the nesting...came the urge to figure out a solution for Jordyns homework situation. See, Jordyn has a desk.....that is mainly used for collecting random items because she literally does not use it. She does her homework on the kitchen table so throughout the year there is homework and paperwork scattered all over the table and i'm constantly organizing it. I looked up a few different options for homework stations, most of which didn't work for me. I have one child so I didn't need a huge space or desk area. I decided to create a little caddy that would sit on the kitchen table. 

Although this isn't a craft, this is such a quick #DIY project that'll help you stay organized this school year! 


Most of the supplies I purchased are from Target and Staples. I'm using a magazine holder with an adhesive label attached as a place for Jordyn to  drop any papers that need to be signed....I don't even want to get into how many "important"papers got lost last year. lol.


Isn't this ruler box adorable? It's perfect for storing glue, tape, and notebooks! These glass jars are from the Dollar spot. The short one is perfect for storing all of her fun erasers..I mean, lets just look at those macaroons! SO CUTE!
That rainbow note pad and that ice cream pen is giving me all the happiness right now! ugh. 
I organized everything on a serving tray and it now sits in the middle of the dining table, which we never actually use to dine on. lol. 
This #DIY took me all of 10 minutes and 20 dollars. 

I'm curious,  where do your kiddos do their homework during the school year?

Xo, Jeanice

5 ways to be more productive during the day.

Monday, August 8, 2016


Being productive is one of those things that has taken me a lot of time to figure out, I mean, lets be honest, how many of us plan an entire day of activities, chores, and errands only to end up binge watching Greys Anatomy on Netflix?...

Nobody?...Nobody?....oh, must just me then. 

Weeellllll then, for those of us who aren't super perfect productivity super heroes, i'm going to share some of the tips i've figured out that help make my days just a little more productive!

TIP 1: MAKE YOUR BED!
The first thing I do when I wake up is make my bed......ok no, it's turn on my Keurig, BUT while its heating I make my bed. This helps make my room look more tidy and reduces my urge to lay back down and get sucked into the blanket monster.

TIP 2: TAKE A FEW MINUTES TO FOCUS ON YOURSELF.
I like to start my day by taking 5-10 minutes for myself before the kid wakes up...some days I sit in silent meditation, some days I read or watch the news, some days I squeeze in a little morning yoga if I woke up a little sore.....whatever it is that makes you happy, take some time to do it...it's a big productivity killer if you wake up and automatically overwhelm yourself with tasks and to-dos. 

TIP 3: CUT YOUR TO-DO LIST IN HALF
Once my coffee is made, I like to sit at my desk and make a to-do list for the day. I write down things I would like to get done that day but I don't overwhelm myself...don't go putting 20 things on your list and then pull your hair out trying to finish them all. Keep it short but keep the most important tasks at the top of the list and tackle those first. That way, if you don't make it through the entire list, at least your most important tasks were completed...you can move the rest to tomorrows list!

TIP 4: GET DRESSED.
While it's really easy to lounge around in your pajamas all day, the simple act of getting up and getting dressed makes you feel productive! I like to drink my coffee and make my list and then shower, get dressed, and get ready for the day.

TIP 5: DONT MULTI-TASK.
So you've gotten a little "me" time in..you've had your coffee, you've made your list, you're dressed and ready to tackle that list...you're energized and feel like you can do 5 things at once.....WRONG!
Tackle one thing at a time, trying to multi-task will set you back. Multi-tasking reduces your efficiency because your brain can really only focus on one thing at at time. When you try to do more than one thing at at time, your brain doesn't actually have the capacity to complete each task successfully so things end up half finished or not finished as best they possibly could. 

So now that you've got it all figured out, go forth and carpe that diem!

Xo, Jeanice :)

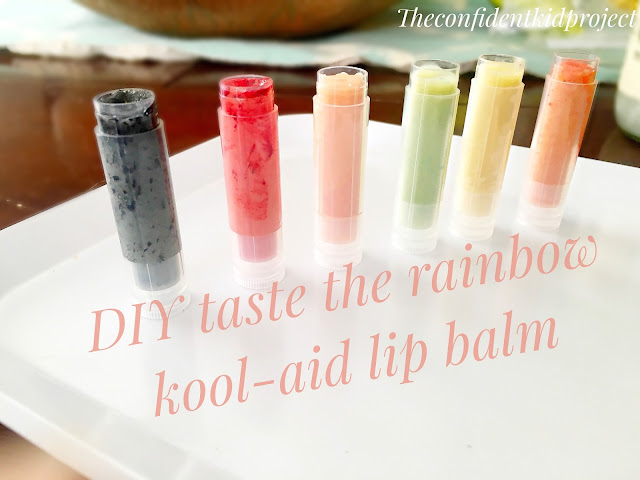
DIY Kool-aid lip balm

Friday, August 5, 2016


Happy #DIYFRIDAY

If you follow me on Snapchat ( Jeanicewebb) you know that last week Jordyn and I made these kool-aid lip balms, today i'm sharing all the details! I let Jordyn decide what craft she wants to make every week and she decided on lip balm. I saw quite a few lip balm DIYs made with vaseline but I wasn't completely sure about it since I don't like the feel of vaseline. I came across a few recipes that called for coconut oil and beeswax and I was sold! 

Here's what you need.
SUPPLIES 
coconut oil.
small measuring cup or funnel
lip balm tubes or small pots


And here's what you do!

1: Start by measuring out about 1/4 tsp of each kook-aid flavor into different containers. 

2: Melt your beeswax in the microwave at 30 second intervals until completely melted. You won't need to heat up the coconut oil, it should liquify once it comes in contact with the hot beeswax. For measurements you want to keep a 2:1 ratio of coconut oil to beeswax. 
We made 6 tubes but for each tube we measured out 2 tsp of coconut oil to 1 tsp of beeswax. 


3: pour your hot mixture into the individual containers you prepared and stir.

4: use your small measuring cup to pour each mixture into its tube, rinsing between each color. Let sit for about 5 minutes until they harden!

These were super fun and simple to make but here's a few tips to help you make yours even better;

1: the colors will be very pale, add a few drops of water to activate the cool crystals to make the colors more vibrant.
2: The grape Kool-aid turns a REALLY dark black color...i'd skip this one. 
3: the Kool-aid is bit sour, so maybe add in a little sugar if you're not a fan of sour, Jordyn likes it so we didn't. 
4: These will tint the lips, so while the crazy colors are fun to make...keep that in mind. 
5: Keep the 2:1 ratio...if you add more beeswax, the lip balm will be too firm and will be harder to spread on your lips. 


Xo, Jeanice 

No churn watermelon sherbet

Wednesday, August 3, 2016


Happy National watermelon day!
While i'm not a huge fan of watermelon, it happens to be Jordyns all time favorite fruit so of course, we couldn't let national watermelon day pass without whipping up some sort of treat....enter, the no churn 2 ingredient watermelon sherbet! Ridiculously easy, lightly sweet, and creamy, it's the perfect fix for this HOT summer weather.

But first....a few quick facts about this summer melon...I mean, what is national watermelon day without some little fun facts, so here they are;

  • The first recorded watermelon harvest occurred nearly 5,000 years ago in Egypt.
  • Watermelon is 92% water.
  • Watermelon's official name is Citrullus Lanatus of the botanical family Curcurbitaceae. ... 
  • By weight, watermelon is the most-consumed melon in the U.S., followed by cantaloupe and honeydew.

Ok...moving on. Here's what you need for this yummy watermelon sherbet!

INGREDIENTS:
1/2 SEEDLESS WATERMELON.....duh.
1 can sweetened condensed milk. 
WHAT YOU DO:
1: Cube your watermelon and toss into your blender.
2: add in 1 can sweetened condensed milk and blend until smooth.
3: pour blended mixture into a loaf pan and freeze until solid.
4: ENJOY!


Xo, Jeanice
CopyRight © | Theme Designed By Hello Manhattan