Slider

DIY erasers

Friday, August 19, 2016


Happy #DIYFRIDAY !

We ( I...ME..Jordyn and Zeke are doing nothing..)  are so busy with back to school prep but I want to share a quick DIY with you guys! These DIY eraser are so fun and easy to make. Jordyn had a blast and she's so excited to take these to school and use them. 

Like I said, these are pretty quick to whip up so lets get started!


WHAT YOU NEED:
Sculpey eraser clay ( I got mine from Michaels)
baking sheet
WHAT YOU DO:
1: preheat oven to 250 degrees
2: Break off pieces of eraser clay in your desired colors and form the shapes you want. 
3: place on a baking sheet and bake as instructed on package. ( 20 mins.)
4: Let cool completely before use.

Thats it!...SO easy. Ours turned out great but here is a few tips to help yours turn out a little better:

1: When mixing colors, fold colors in gently and don't knead too much, the dominant color will take over and instead of a blended look, you'll end up with one flat color. 
2: The package says to bake for 20 mins but ours are a little hard, I suggest checking your erasers around the 15 minute mark. 
3: Glitter is not included so if you want a little sparkle, you'll have to add your own. 

This is such a quick and easy back to school craft!

Xo, Jeanice :)

5 ways to encourage a love of learning in your child

Wednesday, August 17, 2016


Back to school is right around the corner and as parents we're all doing our happy dances and daydreaming about all the quiet, alone time we're going to have....meanwhile, the kids are all trying to figure out ways to fake sick for the next few months to avoid going back.
*cough, cough..mom I have a fever in my big toe, I can't go to school today.*

Truth is, children are naturally curious and love to learn, thats why they tend to bug us asking 10000000 questions a day. However, as they grow older, if that curiosity and love of learning isn't fed, it starts to fade and eventually burns out. As our children's first teachers and role models, it's important that we foster our children's love of learning both at home and in academic settings early on so that when they get older, it sticks with them.
 Here are 4 ways I encourage a continuous love of learning in my daughter!

1: I FIGURED OUT HER LEARNING STYLE.
This is probably the biggest thing.
Every child learns differently, there is no one size fits all to learning so figuring out how your child learns best will help you figure out how to teach them. Theres a variety of different learning styles from verbal, physical, and logical, to social, solitary, and visual. Study your child, figure out in what setting they learn best and go from there. Jordyn is a creative, so she's a very physical learner. She learns best with hands on activities and crafts so I make sure to provide lots of those opportunities.

2: I CREATE A HOME THAT ENCOURAGES LEARNING.
Learning begins at home so I make sure to create an environment that encourages Jordyn to constantly learn. I make sure we do activities or create crafts that are aligned with her interest, I stock her bookshelf with things I know she will read, I keep her artwork and things she's created on display, we even try to watch shows aligned with her interest. I make her interest my interest and try to keep our home as encouraging as possible.

3: I MAKE LEARNING FUN.
We know by now that children tend to learn more when they're having fun. When children are enjoying themselves they're more engaged in the learning process so I try to always make things fun and interesting for Jordyn. Playing games, doing crafts, going on field trips, and exploring new places   related to her interest are a few ways I make learning fun for her. I try to teach her that learning, even in the most fun ways, is motivating and rewarding.

4: I ENCOURAGE CURIOSITY
We all know that those "whys and hows?" can be annoying but I would rather my daughter ask too many questions than too few. I'd rather her stay curious than not be interested at all. We, as parents, play such a huge part of fostering and encouraging our children's curiosity so it's important that I  do my best to always encourage it. As hard as it may sometimes be, instead of giving vague answers to her questions I answer them as best I can. Added bonus, if I don't know the answer to something we look it up together and we both learn something!

5: I PAY ATTENTION TO WHEN SHE NEEDS A BREAK
I try to pay attention to times when Jordyn gets overwhelmed and frustrated and I encourage her to take breaks during homework if she needs. I don't jam pack her schedule with activities. I give her time to just be....to binge on tv...to play with no lesson behind it...to relax and just be.

The most important thing is that we, as parents, never let our love of learning fizzle out. We are never too old to learn something new and if our children see us excited about learning, they will be too! Get out there and learn something new today!

Xo, Jeanice.

Rosemary vinegar rinse for hair

Monday, August 15, 2016


As you all know, i've been protective styling my hair for almost the entire summer and while I love it, my scalp gets really dry and itchy resulting in me having dandruff from scratching. I starting doing a lot of research on what I could do to eliminate the dryness and I came across some information about using a rosemary tea rinse on your hair! 
I found through my research that rosemary is really one of the most beneficial herbs for your hair. In addition to containing anti-inflammatory and antimicrobial properties, which is great for reducing itchiness and dandruff, rosemary is also said to stimulate and improve circulation to the scalp which in turn, encourages hair growth. It is also great to improve shine and gently cleanse the hair. 
I came across multiple ways to create a rosemary hair rinse but the one I settled on contained apple cider vinegar. ACV rinses are really popular among the natural hair community because it is extremely clarifying and helps to remove build up without stripping the hair completely. ACV also helps to leave hair shiny, improve body and definition of curls, and stimulate the scalp. 

So, your armed with all your information and now you're ready to make your hair rinse, so lets get started!
WHAT YOU NEED:
Fresh rosemary. 
Apple Cider Vinegar. 
Water. 
Pot for boiling.
Container for storing your rinse. 

WHAT YOU DO:
1: Start by bringing a big pot of water to boil, how much water you use is up to you. I would recommend making a large batch and keeping the excess for future use. 

2: Add a couple bunches of your fresh rosemary and turn the boiling water down to a simmer. Let simmer for 20-30 minutes. ( Your house will fill with the most amazing rosemary scent...bonus!)

3: Turn your boiling water off and let cool completely, remove your rosemary and strain water into a bowl. 

4: Add 1-4 tablespoons of ACV per each 8 ounce of water you used and stir. Experiment to find what your hair likes best. Typically, dry hair likes less and oily hair likes more. 

5: Pour into a container that has a lid for storing. 

HOW TO USE?
I use this rinse about twice a week in the shower, since I don't wash my hair with my twists in I will rinse my hair in warm water and then pour the rosemary rinse through my hair and then let it air dry. I don't rinse it out, ( the vinegar smell will go away once dry and you'll be left with the most amazing rosemary scented hair.) 

If you're using this on your natural hair...cleanse your hair as normal and follow up with your rosemary rinse. Again, don't rinse out.

A FEW TIPS:
1:Store your rinse in a bottle with a squirt top, making it easier to squirt directly onto your scalp.
2:  Store your rinse in the refrigerator. While I love the feeling of the cold rinse on my scalp, some of you may not. If that's the case, either make your rinse right before you're about to use it or remove it from the fridge and let it come to room temp before taking a shower. 
3: Always make enough for multiple applications, that way you don't have more to make more each time you want to use it. 

Xo, Jeanice 


MINI HOMEWORK STATION

Friday, August 12, 2016

Happy #DIYFRIDAY

 How has everyones week been? We're crazy busy over here preparing for back to school. Is non-pregnancy nesting a thing? Because I think I have it. 
Seriously. All of a sudden i'm organizing everything.....Like, I have this crazy overwhelming desire to get my home prepared and organized. But, not for a baby...for the new school year. HA!
So, with the nesting...came the urge to figure out a solution for Jordyns homework situation. See, Jordyn has a desk.....that is mainly used for collecting random items because she literally does not use it. She does her homework on the kitchen table so throughout the year there is homework and paperwork scattered all over the table and i'm constantly organizing it. I looked up a few different options for homework stations, most of which didn't work for me. I have one child so I didn't need a huge space or desk area. I decided to create a little caddy that would sit on the kitchen table. 

Although this isn't a craft, this is such a quick #DIY project that'll help you stay organized this school year! 


Most of the supplies I purchased are from Target and Staples. I'm using a magazine holder with an adhesive label attached as a place for Jordyn to  drop any papers that need to be signed....I don't even want to get into how many "important"papers got lost last year. lol.


Isn't this ruler box adorable? It's perfect for storing glue, tape, and notebooks! These glass jars are from the Dollar spot. The short one is perfect for storing all of her fun erasers..I mean, lets just look at those macaroons! SO CUTE!
That rainbow note pad and that ice cream pen is giving me all the happiness right now! ugh. 
I organized everything on a serving tray and it now sits in the middle of the dining table, which we never actually use to dine on. lol. 
This #DIY took me all of 10 minutes and 20 dollars. 

I'm curious,  where do your kiddos do their homework during the school year?

Xo, Jeanice

5 ways to be more productive during the day.

Monday, August 8, 2016


Being productive is one of those things that has taken me a lot of time to figure out, I mean, lets be honest, how many of us plan an entire day of activities, chores, and errands only to end up binge watching Greys Anatomy on Netflix?...

Nobody?...Nobody?....oh, must just me then. 

Weeellllll then, for those of us who aren't super perfect productivity super heroes, i'm going to share some of the tips i've figured out that help make my days just a little more productive!

TIP 1: MAKE YOUR BED!
The first thing I do when I wake up is make my bed......ok no, it's turn on my Keurig, BUT while its heating I make my bed. This helps make my room look more tidy and reduces my urge to lay back down and get sucked into the blanket monster.

TIP 2: TAKE A FEW MINUTES TO FOCUS ON YOURSELF.
I like to start my day by taking 5-10 minutes for myself before the kid wakes up...some days I sit in silent meditation, some days I read or watch the news, some days I squeeze in a little morning yoga if I woke up a little sore.....whatever it is that makes you happy, take some time to do it...it's a big productivity killer if you wake up and automatically overwhelm yourself with tasks and to-dos. 

TIP 3: CUT YOUR TO-DO LIST IN HALF
Once my coffee is made, I like to sit at my desk and make a to-do list for the day. I write down things I would like to get done that day but I don't overwhelm myself...don't go putting 20 things on your list and then pull your hair out trying to finish them all. Keep it short but keep the most important tasks at the top of the list and tackle those first. That way, if you don't make it through the entire list, at least your most important tasks were completed...you can move the rest to tomorrows list!

TIP 4: GET DRESSED.
While it's really easy to lounge around in your pajamas all day, the simple act of getting up and getting dressed makes you feel productive! I like to drink my coffee and make my list and then shower, get dressed, and get ready for the day.

TIP 5: DONT MULTI-TASK.
So you've gotten a little "me" time in..you've had your coffee, you've made your list, you're dressed and ready to tackle that list...you're energized and feel like you can do 5 things at once.....WRONG!
Tackle one thing at a time, trying to multi-task will set you back. Multi-tasking reduces your efficiency because your brain can really only focus on one thing at at time. When you try to do more than one thing at at time, your brain doesn't actually have the capacity to complete each task successfully so things end up half finished or not finished as best they possibly could. 

So now that you've got it all figured out, go forth and carpe that diem!

Xo, Jeanice :)

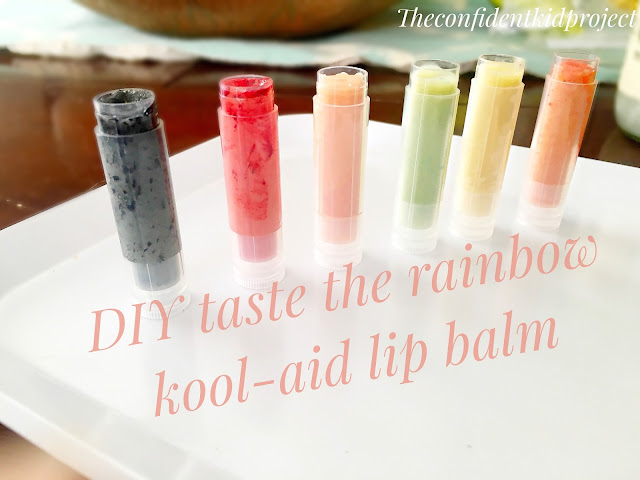
DIY Kool-aid lip balm

Friday, August 5, 2016


Happy #DIYFRIDAY

If you follow me on Snapchat ( Jeanicewebb) you know that last week Jordyn and I made these kool-aid lip balms, today i'm sharing all the details! I let Jordyn decide what craft she wants to make every week and she decided on lip balm. I saw quite a few lip balm DIYs made with vaseline but I wasn't completely sure about it since I don't like the feel of vaseline. I came across a few recipes that called for coconut oil and beeswax and I was sold! 

Here's what you need.
SUPPLIES 
coconut oil.
small measuring cup or funnel
lip balm tubes or small pots


And here's what you do!

1: Start by measuring out about 1/4 tsp of each kook-aid flavor into different containers. 

2: Melt your beeswax in the microwave at 30 second intervals until completely melted. You won't need to heat up the coconut oil, it should liquify once it comes in contact with the hot beeswax. For measurements you want to keep a 2:1 ratio of coconut oil to beeswax. 
We made 6 tubes but for each tube we measured out 2 tsp of coconut oil to 1 tsp of beeswax. 


3: pour your hot mixture into the individual containers you prepared and stir.

4: use your small measuring cup to pour each mixture into its tube, rinsing between each color. Let sit for about 5 minutes until they harden!

These were super fun and simple to make but here's a few tips to help you make yours even better;

1: the colors will be very pale, add a few drops of water to activate the cool crystals to make the colors more vibrant.
2: The grape Kool-aid turns a REALLY dark black color...i'd skip this one. 
3: the Kool-aid is bit sour, so maybe add in a little sugar if you're not a fan of sour, Jordyn likes it so we didn't. 
4: These will tint the lips, so while the crazy colors are fun to make...keep that in mind. 
5: Keep the 2:1 ratio...if you add more beeswax, the lip balm will be too firm and will be harder to spread on your lips. 


Xo, Jeanice 

No churn watermelon sherbet

Wednesday, August 3, 2016


Happy National watermelon day!
While i'm not a huge fan of watermelon, it happens to be Jordyns all time favorite fruit so of course, we couldn't let national watermelon day pass without whipping up some sort of treat....enter, the no churn 2 ingredient watermelon sherbet! Ridiculously easy, lightly sweet, and creamy, it's the perfect fix for this HOT summer weather.

But first....a few quick facts about this summer melon...I mean, what is national watermelon day without some little fun facts, so here they are;

  • The first recorded watermelon harvest occurred nearly 5,000 years ago in Egypt.
  • Watermelon is 92% water.
  • Watermelon's official name is Citrullus Lanatus of the botanical family Curcurbitaceae. ... 
  • By weight, watermelon is the most-consumed melon in the U.S., followed by cantaloupe and honeydew.

Ok...moving on. Here's what you need for this yummy watermelon sherbet!

INGREDIENTS:
1/2 SEEDLESS WATERMELON.....duh.
1 can sweetened condensed milk. 
WHAT YOU DO:
1: Cube your watermelon and toss into your blender.
2: add in 1 can sweetened condensed milk and blend until smooth.
3: pour blended mixture into a loaf pan and freeze until solid.
4: ENJOY!


Xo, Jeanice

How to give back this back to school season.

Monday, August 1, 2016


Happy August!
Back to school time is in full swing and Jordyn is so ready to go. I'm not gonna lie, i'm excited for her to go back but i'm also a little bummed about it. Jordyn is at such a fun age, hanging with her all day is a blast. We literally have so much fun crafting and shopping and catching Pokemon. Ha!
 Anyway, I know there will be lots of talk about ways to save money for back to school..shopping on a budget...back to school essentials and so on this month and that's all great, but what I want to talk about right now is different ways to give back and donate this back to school season.
On average, parents will spend over 100 dollars on back to school supplies for their k-12 student....and i'm just talking actual supplies...when you factor in clothes, shoes, and lunch expenses...the average household spends over 600 dollars on back to school. According to NCCP.ORG, about 45% of children in the U.S live in low income families.  For these families, back to school time is just another stressful expense and while i'm well aware that we are all living on a budget, I strongly feel that those of us that are in any position to give back, should.

I live by the strong motto that nobody can help everyone but everyone can help someone, so with that in mind, here's a few ways we can give back this back to school season while sticking within our budget!

VOLUNTEER:
If you can't afford to donate physical supplies contact your local back to school drives or events and volunteer to receive, organize, and distribute the supplies that are being donated. This is the easiest way to get involved and help out your community without coming out of pocket. Most back to school events are huge deals so they are always looking for extra hands to help out.

DONATE SERVICES:
Older children from low income families, who are going through puberty and are concerned with how they are perceived and accepted by their peers often develop low self esteem due to the fact that their parents can't afford to focus on helping them "look good" while they're focusing on trying to afford the basics. Low self esteem often leads to poor performance in school, so, if you're a barber, stylist, nail tech or have any skill set to offer..donating your services for free for kids would work wonders in helping them feel more confident going back to school because really, when you feel good, you do good!

DONATE BOOKS:
According to Scholastics.com, in low income neighborhoods there is about 1 book per 300 children and school libraries in low income neighborhoods are often times closed. It's a proven fact that children that read at home develop stronger vocabularies and language skills but children from low income and poor families have access to such fewer reading materials than those of middle and upper class families, they fall behind academically. Picking up books at thrift stores or donating the books your child has outgrown are easy ways to help these families expose their children to more titles.

PURCHASE SUPPLIES:
We typically donate 100 dollars worth of supplies each season and since we know beforehand that this is the amount we like to donate, we budget and save for it. Whether its 20 dollars, 50 dollars, or 100 dollars....the key to being able to afford to donate items is to budget for it. Skip that Starbucks one day a week, throughout summer and by the time you go school shopping, you'll have saved enough to purchase extra items to donate.

Anything counts and I encourage you all to give back..remember, its our job to shape the world for this future generation.
Also, if you're in Vegas, KTNV news has a list of local back to school drives happening around the valley!

Xo, Jeanice
CopyRight © | Theme Designed By Hello Manhattan