Slider

D.I.Y FRIDAY: CELL PHONE CASES USING DECO FRENZY DECORATING MOUSSE

Friday, July 29, 2016

Happy #DIYFRIDAY ! 

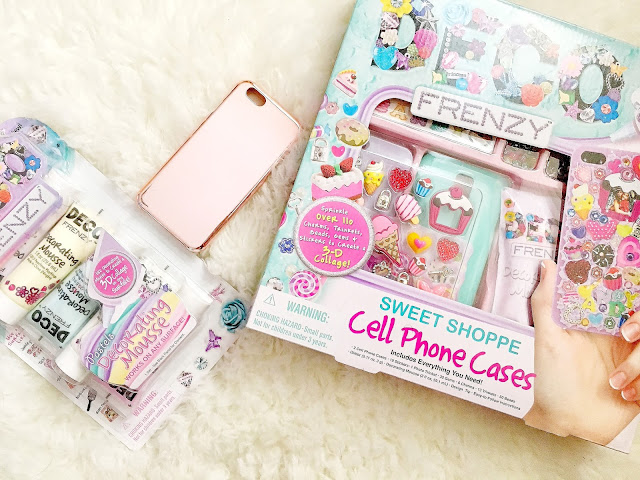
Last week Jordyn and I made these super adorable phone cases using Deco Frenzy decorating mousse.
I picked these up at Michaels . The sweet shoppe cell phone cases pack was originally $14.99 but I used a 40% off coupon!..I also picked up the extra pack of pastel decorating mousse colors for $7.99.

This stuff is really pretty cool, the decorating mouse is like a light whipped....well.....mousse, for lack of a better word,  that hardens over time to permanently set any decorations you add on top of it. It's really fun and easy and you can pretty much decorate any hard surface you'd like. The decorating kit I purchased came with 2 cell phone cases; iPhone 5 and a galaxy 5s ( we didn't use that one, instead I used a plain plastic iPhone 6s case I had for my phone.) along with tons of stickers, jewels, and trinkets to decorate with. 

The mousse comes in a packet very similar to those decorating frosting packets so you can just squeeze the mousse onto the phone case. The mousse packet has a star type decorating tip but Jordyn and I found it a little hard to actually get the mousse to come out as a star...maybe it's user error but it just didn't work for us. Instead we went kind of just squeezed the mousse onto the phone cases and swirled it around a little, making it look fluffy and cloud like..
Then we just added our stickers and charms...sprinkled some glitter on and let it dry overnight!
The box says it should be fully dry in 1-2 hours but to let completely set for 24 hours.

Happy crafting!
Xo, Jeanice 

Why I choose to raise an only child.

Wednesday, July 27, 2016


I get a lot of comments in regards to Jordyn being an only child...I get asked constantly when i'm going to have another...I'M NOT!..I think the thing that bothers me most is when people comment things like " I would have time for that too, if i ONLY had one child" or..." Oh just wait until you have another one, you'll know"....
Um, i'm pretty sure I KNOW.....my daughter will be 9 this year.....9. I've been through all the diapers, the terrible twos, the toddler years, the potty training, the not sleeping through the night, the doctor visits, the wanting to pull my hair out,....Those things don't just disappear because you have one child, i'm pretty positive that I know just as well, the struggles of parenting as anyone with more than one child. 
The motherhood community is extremely hypocritical and judgmental....In my case, it's harder for me to "prove" myself as a mother because i'm both a young mom and a mom of JUST one kid. I think it bothers me that other mothers view mothers of one child as "less than" or view only children as sad, lost, spoiled children that are unfairly dubbed the "lonely only".  I mean, lets be honest, my ONE child is polite, well mannered, smart, independent, confident, respectful, compassionate, and giving. my ONE child doesn't talk back and throw tantrums..... but hey, maybe if you were worried a little less about me ONLY being the mother of one child...you'd notice that your middle child just threw himself on the ground in the middle of Target and wouldn't get up until you agreed to buy him the toy that he wanted.....way to go mom, that'll show him! Definitetly going to take parenting tips from you!
My reasons for choosing to have one child come down to a few, really simple things;

FINANCIALS:
We know financially what we can afford and the life we want to live. 
We want to be able to send our daughter to college and have her graduate without drowning in debt for the next 5 years. Because we have one child, we have been able to build a good sized college fund for her. We also plan on giving Jordyn the world by showing it to her and because she's an only child, we are able afford 2 or 3 vacations a year. 
WE FEEL COMPLETE:
People often make comments about having another child to "complete" our family as if we are somehow incomplete. We feel happy and whole, just the three of us. None of us want another child...Jordyn does not want a sibling. We have the best times, just the three of us, and when I think of adding another child to that mix.....I honestly get a headache. I love kids, but we love life the way it is, we feel so strongly bonded. Our little family of 3 is complete. 
WE HAVE MORE TIME FOR OUR KID:
We are and extremely close family because we don't have to split myself between her and another child. She does well academically because we are able to devote time to helping her study. She never feels neglected because we have time for just her. If she has a problem, we are able to REALLY be there for her and give her our undivided attention. 
WE HAVE TIME FOR OURSELVES:
While being a family is great, we never want to forget that we are also our own people. We are also a couple....not just a family. Choosing to have one child allows us to have more time and opportunity to focus on ourselves. All of us. We are a big "self care" family so  Jordyn enjoys her alone time just like we do. 

My point is, this is a personal choice but it doesn't make me less of a mother. Having one child doesn't mean I don't know the struggle and joys of motherhood. There is no "one size fits all" approach to motherhood but whether you choose to have 1 child or 5...is a personal choice and should never be criticized and judged by other mothers. 

And yea, theres all that "research" that suggests that only children are selfish and spoiled and lonely but Jordyn is fine..she has really high self esteem, she's extremely creative, she knows how to be alone and independent. She also has a ton of friends who love her. She's outgoing, smart, and extremely respectful...because she is RAISED that way. In my opinion, it has nothing to do with whether or not you have a sibling...and everything to do with how you are raised. 

Xo, Jeanice. 

Natural hair: Marley twist details.

Monday, July 25, 2016

I think the question I get asked most often whenever I post a selfie is " what kind of hair is that?"
I wrote about my twists on an instagram post awhile back but since the question gets asked over and over and i'm REALLY not a fan of repeating myself over and over....I figured I would just give details here on the blog so that the information is always here for you guys to refer back to.
So, here we go!
QUESTIONS AND ANSWERS:
WHAT KIND OF TWISTS ARE THESE?:
They're Marley twists. Marley twists are referred to as such because they use marley hair which is coarser in texture than traditional synthetic hair.
WHAT TYPE OF  HAIR DID I USE?
I used Bobby Boss Jamaica braid hair. For the shorter, thinner twist I used1/12 packs of hair in color 1B. For the thin twists I used one strand of hair for each twist. For my longer, thicker twists, I used 5 packs of the same hair. For the long twists I used 2 strands of hair for each twist.
WHAT IS THE LENGTH OF THE HAIR?
The hair itself doesnt come short. It is about 20 inches out of the package. For the short twists I cut each strand in half so they're about 10 inches.
HOW DID I PREP MY HAIR?
I washed, deep conditioned, and moisturized my hair using the LOC method. I then let my hair air dry overnight.
 Since i've been doing these twists almost all summer, i've been using different products.
 My most recent uses are:
Tresemme Botanique  shampoo and conditioner.
TGIN Honey Miracle Hair Mask
Renpure coconut whipped creme leave in.
Dark and Lovely Au Naturale Lock It In Sealing Cream
HOW DID I PREP THE MARLEY HAIR?
I rinsed the hair with an apple cider vinegar rinse ( equal parts ACV and water) and let dry over night.
INSTALLATION?
Youtube! There are tons of tutorials on Youtube with different techniques for installation. Find one that works for you. The video I referenced for installation was this one by TheNotoriousKIA on youtube:

WHAT PRODUCTS DID I USE FOR TWISTING?
I alternate between  products each time I retwist but my favorite to use is
Camille Rose Naturals Almond Jai Twisting Butter. Since the twisting butter is kind of pricey it can get expensive if you're redoing them often, ORS Smooth And Hold pudding is a great alternative.
HOW OFTEN DO I RETWIST?
Once a week I retwist the front edges of my hair and every 2 weeks I completely take them down and start the whole process over.
HOW DO I SEAL THE ENDS?
Dip them in boiling water. Be careful to remove the pot of water from the stove and pour into a bowl or pitcher before dipping.
HOW DO I SLEEP WITH THEM?
I wrap a scarf around my edges and cover the rest with a bonnet.
ARE THEY HEAVY?
 Not when they are hanging down but can be a little heavy when piled high.
HOW LONG DID IT TAKE?
about 3 hours.
WHERE DID I GET MY HAIR CUFFS?
I have 2 sets of cuffs one from Amazon and I also have beads from MICHAELS


Xo, Jeanice 

DIY FRIDAY: Gotta Catch 'em All, Pokemon flair pins.

Friday, July 22, 2016


Raise your hand if you're playing Pokemon Go....
*oh,....me either. wink, wink.

But seriously, Jordyn has recently become OBSESSED with this game and i've got to admit, it is super fun! It seems like we go out almost every night to walk around the park and catch Pokemon. It really is amazing to see how many people are actually out, walking around, and spending time in public. 
Since Jordyn is on a mission to become a Pokemon master, we decided to create a little bit of Pokemon flair for her to wear. These are so cute and so easy to make! 

SUPPLIES;
Black permanent marker
markers or crayons
scissors
Hot glue gun.
Pin backs
Printed Pokemon stencils
STEP 1.
Start by preheating your oven to 325 degrees then doing a google image search for your favorite Pokemon and save them to your computer. You'll want to resize your Pokemon images to about 3x3. Print them off in black and white....to save ink, duh. Place your shrink plastic ( rough side up) over the images and trace with your permanent marker.
STEP 2: 
Color in your images. Jordyn and I used markers but you could also use acrylic paints, colored pencils, or crayons.

STEP 3: Cut out your images. Cut along the black line, there doesnt need to be any white space around the outside. 

STEP 4: SHRINK! Jordyn thought this part was so cool. Place your images on a baking sheet lined with either foil or parchment paper then place in the oven. Turn on your oven light to watch your images shrink, it'll take 1-3 minutes. Jordyns mind was blown, she couldn't stop talking about it. It really is fun to see how these big images get so tiny. ( They shrink to about 1/3 of the original size and become 9 times thicker) And don't worry, the shrink plastic will start to curl up while its shrinking but will flatten out once its done. 

STEP 5: Once your Pokemon are cool, use your hot glue gun to add the pin clips to the back ( rough side)

STEP 6: Pin to your outfit and go catch 'em all...with flair!


Xo, Jeanice

Developing a basic personal hygiene routine for girls.

Wednesday, July 20, 2016


Did you guys know that girls typically begin puberty between ages 8-13? And, in those early years most parents neglect to teach their daughters proper personal hygiene. I mean, I don't remember being talked to about the importance of personal hygiene...it was kind of something I had to figure out as I went along..... As Jordyn grows into these "tween" years we are starting to focus a lot on proper personal hygiene.  Developing a proper personal hygiene routine BEFORE puberty is full blown, during the early tween years, is vital because we are creatures of habit and if our girls are taught to take care of themselves early on, it'll continue through their teen and adult years. 
I'm finding that proper personal hygiene isn't something thats really discussed but instead, is just expected...kind of like how we teach our kids about the importance of hand washing so as they grow older, we just expect it of them. The problem is that most young girls are not being taught how to take care of their developing bodies and why it's important, so how can they be expected to do something they were never taught? 
Here are a few helpful tips to help get the ball rolling on developing a basic personal hygiene routine:

FIRST THINGS FIRST:
It all starts with a conversation. Sit them down and explain to them what changes their body is or will be going through. Most kids can grasp the concept of infections and diseases without knowing the in depth details so go ahead and explain the importance of proper personal hygiene, just leave out all the extra details you're uncomfortable with talking about.  The goal is to help our girls feel comfortable in their developing bodies and helping them be informed and knowing the basics in personal hygiene is the first step. 
SHOWERING: 
When Jordyn was younger it was ok for her to miss a bath or shower every other night. If she went to stay the night at her cousins house and played too hard and fell asleep without showering,  it wasn't a big deal. Now that she's older I insist on her showering daily. This is not only to get her clean, but to also create habit. Some girls may want to shower in the morning, some may want to shower at night...talk with your daughter to figure out what works best for her but insist that it is part of her daily schedule. Jordyn thinks showers are boring ( like...who are you?..showers are the most relaxing thing ever)...so I try and make it something she actually looks forward to with fun bath bombs, colorful bath puffs, and yummy smelling shower gels. You want to be careful with sensitive skin so make sure you know your daughters skin so you're buying products that won't cause outbreaks or rashes.

SKIN CARE:
Since they are still pretty young, skin care at this age is really just about removing dirt while also creating habit and routine. Young tweens don't really need more than water and a gentle facial cleansing cloth to clean their face. The point is to teach them the basics of skin care so get your tween in the habit of washing their face morning and night. It's also not uncommon to see the beginning stages of puberty at this age, however, acne products are not yet necessary and will do more harm than good. If you are noticing the beginning signs of acne, a gentle cleanser such as Cetaphil would be all their skin really needs. 

DEODORANT 
Lets just get this out of the way; Our bodies need to sweat. It is the bodies way of regulating temperature and keeping us from overheating. Antiperspirants contain aluminum based ingredients that are meant to block the sweat glands. The aluminum based ingredients in antiperspirants have been linked to medical problems. I suggest skipping the antiperspirants.  
That being said, body odor is one of the first signs that puberty is beginning. Not all tweens need a deodorant, some simply need to wash more often. Everyones body differs so it is up to you to experiment and monitor your tween to figure out what your specific needs are. Deodorant will also not replace basic hygiene. Toms of Maine offers a great, antiperspirant free, deodorant option for young tweens. 

ORAL CARE:
Oral care is one of the easiest things to create routine for and yet, it is often regarded as one of the lest important. Jordyn had braces in kindergarten and has since been really great at taking care of her teeth. Brushing and flossing twice a day has always been one of those things I have refused to let slide and as a result, Jordyn has beautiful, healthy teeth and has never had a cavity. Poor oral hygiene is linked to major health issues and can be the cause of low self esteem so it's important to visit the dentist twice a year and encourage a healthy oral healthcare routine. 
BTW, Jordyns dentist let us know that it is not necessary to use mouthwash because toothpaste has more fluoride in it than the actual mouthwash itself so, unless you just want an extra boost of tingly freshness...that step is not totally necessary. 
HAIR CARE:
As a mother a naturally curly girl, I take full reign over hair care...as she's growing older though, i'm letting her have more control over her routine. Talk with your girls about the importance of maintaining clean hair and a clean scalp as oily hair can aggravate acne and product buildup on the scalp can cause irritation and itchiness. Some girls may want to wash more often than others..speak with your daughter about what schedule works best for her but stress the importance of cleaning her hair. 


So by now you've covered the basics with your daughters; shower daily, brush your teeth, wash your face...In addition to these basics, it is important to talk with your daughter about more sensitive areas and topics. Speak with her about the importance of keeping her private areas clean and about menstruation.  Let your girls know that these things are not for vanity reasons, they're for health reason and are a part of their daily responsibilities. If she is resistant to practicing basic hygiene, give her repercussions just as you would if she didn't do her chores. 
Of course, as they grow you'll introduce  different products and add more to the routine as needed but for now you're just building the foundation...creating the habit so that it becomes routine for them. Using gentle reminders and practicing proper hygiene ourselves will also help with getting our girls to follow our lead...I mean, good luck with getting your daughter to wash her face every night if she never sees you doing it. 

Xo, Jeanice

Fruity Pebble Ice Cream Sandwiches.

Monday, July 18, 2016

Jordyn and I have been hanging out in the kitchen a lot this summer, whipping up fun recipes is one of our favorite things to do together. This weekend we whipped up these Fruity Pebble ice cream sandwiches. 
* Sidenote: Ice cream sandwiches are my jam....like, if I could only eat ice cream one way for the rest of my life, it'd be in ice cream sandwich form.*
Anyway, these are like regular ice cream sandwiches...but better...and they start with a base of regular   "Rice Krispies" treats...but better, because you know, Fruity Pebbles and whatnot.
By now we all know how to make cereal treats, at least we should...unless you're a recluse thats been living under a rock for the past 20000 years. So, let me break down the basics for all my recluses out there. 
INGREDIENTS: 
1 bag Marshmallows I used Kraft jumbo marshmallows.
1 box  Fruity Pebbles ( ok, 5 cups..but really,...the whole box.)
5 tablespoons butter.
YOU'LL ALSO NEED
Cookie sheet ( you'll want to use a thin one.)
Non-stick cooking spray or foil.
WHAT YOU DO:
1: spray pan with nonstick spray and/or cover with foil.
2: Melt together marshmallows and butter over medium heat.
3: Once completely melted remove from heat and fold in cereal one cup at a time.
4: scoop into pan and flatten using your hands. ( if you spray your hands with non-stick spray less cereal will stick to your hands.)
5: Let cool.
Ok, so now that we've got the basics out of the way...lets move on to the real star here...assembling the ice cream sandwich. 
FOR THE SANDWICHES YOU'LL NEED:
Large round cookie cutter ( if you don't have one a glass will do the trick.)
Ice cream flavor of your choice. I used a pint of vanilla. 
WHAT YOU DO.
Use your cookie cutter to cut rounds out of your cereal treats.
Scoop your ice cream and sandwich together.
I used a pint and I just cut through the packaging to make perfect rounds of ice cream and then peeled off packaging from each round.

These are so fun and bright and colorful, Jordyn had a blast making them. We can't wait to try them with cocoa pebbles or even...oooohhh, cinnamon toast crunch! Really the possibilities are endless. Go.....Grab your kiddos, get them in the kitchen and whip up some of these babies! I promise they'll be a hit!

Xo, Jeanice. 

D.I.Y Friday: oven bake clay coasters

Friday, July 15, 2016


Happy Friday!

We made it through another week, yay for us!! To celebrate, here's another #DIYFRIDAY post. This week, Jordyn and I made oven bake clay coasters. I was scrolling on Pinterest and came across some similar coasters and died over how gorgeous they were!...I mean, look...how just how fun and bright and gorgeous they are! Not to mention, they're extremely simple to make. 

SUPPLIES:
Oven bake clay.
Glaze for sealing (optional.
Rolling Pin or large round jar.
Gold craft paint.
Small brush.
Cup with wide/sturdy rim.
Cutting board.
Xacto knife
Baking sheet.

WHAT YOU DO:


1: Roll out each color of clay you want to use into a thin snake. 
2: combine all colors and twist into one 
3: Roll twist into ball.
4: Use rolling pin or large round jar to roll out your ball. 
5: Use your cup as a guide and cut around the outside.
6: Place your marbled clay rounds on a baking sheet and bake according to package directions.
( Since I used Sculpey oven bake clay I baked mine at 275 degrees for 30 mins. It is important NOT to over bake your clay or it'll start to turn brown and the colors won't be as vibrant.)


Once your clay is completely cool use a small paintbrush to paint a few coats of gold around the outer rim. Allow paint to dry and seal with glaze if you desire. The glaze will give the coaster a glossy finish but is not totally necessary. If you choose to skip this step the coasters will have a more matte finish. 

Jordyn and I made these together so they're not completely perfect ( 8 year old cutting skills..) but we did it together so I love them! These are such a fun craft to make with kids and would be perfect to make as little gifts. Not to mention, the color possibilities are endless!

Happy crafting, 
Xo, Jeanice

Natural hair: daily moisturizing with refresher sprays.

Wednesday, July 13, 2016


You all know by now that Jordyn and I have been protective styling most of the summer and I think the question I get asked most often is
 " How do you maintain moisture while protective styling?"

First, let me start by saying that we live in Vegas where the average temp during the summer is 100 degrees. It's very dry and very hot. Protective styling or not, daily moisturizing is a must! 

Because it's not always an option ( read: aint nobody got time for that.) to DIY a refresher spray or to take down Jordyns hair every time I need to moisturize, I rely heavily on quality sprays with decent prices that I can pick up from the store 
. As the name suggests, refresher sprays typically do just that...they refresh and revitalize your hair by giving them an extra boost of water and nutrients. These types of sprays are typically something water based followed up with ingredients dedicated to moisture and hair health. 
Refresher sprays are holy grail for me but it did take a while to find sprays that provided the moisture I wanted while also not creating too much build up or flakiness. 
These are my fave!:


All of these are tried and true for me. They don't rapidly create flakes or build up, they have a range of hair happy ingredients from wheat protein and Neem oil to flaxseed and coconut oil. Refresher sprays are great for revitalizing your second, third, or fourth day hair, when you're protective styling, and when you just don't have time to soak in the shower.

Xo, Jeanice

Your life matters; An open letter to my young, black queen.

Monday, July 11, 2016


Dear Jordyn,
I sit here writing this with a heavy heart because in the past 48 hours I have watched 2 black men murdered in cold blood. I watched as our community cried in outrage, again...because this isn't the first time tragedies like this have happened and sadly it won't be the last. 
In the past 48 hours i've felt the piercing pain and sadness of every mother or wife of young black children and strong black men. Their cries have pierced my soul so deeply i'm not sure i'll ever recover. Their tears have permanently stained my skin. I carry their hurt in my heart. I wear their pain on my sleeve. 
 Sweet girl, you're too young to understand and too innocent to have the weight of this hurt put on you. So for now I shield you from it. I smile and I shield you from it. I hold you and I shield you from it.  I do my part in protecting your innocent view of the world. I do my part to make sure you stay believing in all the good and magic that this world has to offer.
 I refuse to let you see the world as this cruel, nasty, hateful place....because you are too young, too innocent, too precious. 

The ugly truth is, there will be at time when you aren't too young. A time when you will be shown the worlds true colors and stand face to face with prejudice. 
You'll stand face to face with people will judge you, not based on reason or actual experience with you, but because of the color of your skin. You'll face people who will discriminate against you because of the kink and curl of your hair, because of the richness of your melanin. You'll come across people who will view you as less than because you are both black and a woman. You'll stand face to face with people who are determined to snuff out that fire within you, who will be relentless in trying to dim your light. People that will try to convince you that your life doesn't matter. 

But you won't let them.

You won't let them because I have worked tirelessly to build you up and arm you with layers of self confidence and self love so thick that the evils of the world will have a hell of a time trying to break through. You won't let them because I have raised you to always stand your ground. We know you're going to fall.....you'll probably fall a lot but you won't stay down. You won't stay down because I raised you to always get back up. You'll go through things....as everyone does. You'll get hurt...as everyone does. And, you'll succumb to your emotions...as everyone does and you'll fall into dark places. But, you won't stay there because I have raised you to allow yourself to be in your emotions, to feel all the feelings, to see the beauty in the struggle and the magic in the pain, but also to know your limits and always pull yourself out of those dark places.....because sweet girl, nothing good comes from staying in dark places.

I promise you that I will put my heart and soul into raising you into a young woman who knows that her life matters. A young woman who will be confident in knowing that she can accomplish every single thing she sets her mind to. A strong, proud young woman of color who will laugh in the face of anyone who tells her she's " pretty for a black girl." I promise to continue to work on myself so that I can always be a shining example of what a strong woman should be and continue to expose you to women like Ellen Johnson Sirleaf and Mae Jemison, strong black women who came before you, so that you will always stay inspired.

But for now, it starts with raising you to believe in yourself.

Everything starts with believing in yourself. It ends with believing in yourself. Believing that while having others believe in you is great, you don't need validation from anyone....not even me. Believing that despite the " angry black girl" narrative, your voice matters and it's ok to have opinions, ok to voice them, and ok to never back down when you feel passionately about something.  Believing that it's ok to admire someone else's beauty without questioning your own, and for that matter, believing that smart is beautiful so never downplay those smarts for anyone.

It starts with raising you to believe that your life matters. Believing that because you are both black and a woman, you are one of the worlds most precious assets, an unshakeable force of nature.

It starts with raising you to believe that you can do hard things, that you are worth it, that your life matters.....because it does.

Baby girl; never forget...never doubt...never question....Your life matters.

Xo, mommy.

D.I.Y Friday: Dream catchers

Friday, July 8, 2016


Happy #diyfriday! 

This week Jordyn and I made dream catchers and while I think they're beautiful, she is weirdly obsessed with them. Dream catchers are one of the most fascinating traditions of Native Americans.  Traditionally, dream catchers are intended to protect the sleeping from negative dreams. The good dreams slip through the holes of the dream catcher and glide down to the sleeping person below while the bad dreams get caught in the web and expire when the sun rays strike them.


Supplies:

-Wood embroidery hoops.
-yarn in multiple colors.
-felt in multiple colors.
-washi tape.
-beads ( we used pony beads)
-feathers.
- pom poms. (We used pom pom beads.)
- hot glue gun.
-scissors.
All supplies were purchased from MICHAELS


STEP 1:
Start by wrapping your wooden embroidery hoops with different colored washi tape. There are no rules here, have fun with your designs!


STEP 2:
Start wrapping your different colored yarn tightly around your embroidery hoop. Wrap your yarn in different directions to create different patterns. Make sure to wrap tightly or the yarn will slip. I helped Jordyn by placing my finger on pieces of the yarn around the hoop as she wrapped. Continue wrapping until you are happy with your design and then tie a knot to secure it.


STEP 3:
Tie strings of yarn to your hoop in different lengths and colors and then decorate!

We cut hearts out of our felt and used hot glue to add them and the feathers to the ends of our dream catchers.

We hot glued pieces of yard to the top of our dream catchers to create a loop for them to hang onto the wall with.


Happy crafting and sweet dreams!
Xo, Jeanice.

What are you willing to sacrifice to make your dreams come true?

Wednesday, July 6, 2016


We all know by now that happiness isn't about having it all or doing it all. It's not about how many hours we work, how much money we make or the amount of possessions we have...We know all of that. We know what happiness isn't..but, does anyone know what their happiness IS?...I've found that the most difficult thing about happiness is figuring out what exactly makes us happy...I mean, really, truly, deeply happy. It's about figuring out what our dreams are and having the courage to pursue them. See, we put a lot of pressure on ourselves to make more money...to have a bigger house..a nicer car...to buy more of things..to keep up with the Joneses...in hopes that these things will bring us happiness, because we are taught that these things bring happiness.

We tell ourselves that if we work harder and make more money, we'll be happy. That the happiness will come. 
So we push ourselves to work the jobs we hate, buy more things we don't need...and wait...and wait...and wait...and wait...but it doesn't come. The happiness doesn't come. 
The thing is, once we achieve these things, once we make more money, have a bigger house, a better car, own more possessions...9 times out of 10, we're still left with a feeling of emptiness. We are still searching for more to bring us happiness. 

Because that is not real happiness.
Real happiness is letting go of what we think our lives are supposed to look like and instead, celebrating what our lives actually are and pursuing the goals and dreams that our true hearts desire. 
Real happiness is about sacrifice.
The law of sacrifice says that you cannot get something you want, without giving up something in return. So, in order to attain something we believe is of greater value, we must be wiling to give up something we believe is of lesser value. 

In order to truly be happy, to reach our goals, to pursue our dreams, we have to be willing to sacrifice in order to make space in our life for the those things. Having the courage to pursue our dreams means living for a while like most people won't, so that you can spend the rest of your life living like most people can't. 

For example, Zeke and I both grew up in poverty. Surrounded by more terrible things than most people can imagine. Things that children should never be exposed to. When we moved in together we were broke. We lived paycheck to paycheck, in a tiny apartment with a kid. We struggled. But, we struggled and worked and saved...and struggled and worked and saved..and struggled..and worked..and saved...and missed out of a lot of "fun" because we knew what we wanted. We knew the kind of life we wanted...and a continuous cycle of paycheck to paycheck wasn't it. We scarificed a lot of our youth to pursue the life that we knew wanted. We were willing to put in the work, cut out the extras, and commit to building that life. We didn't eat out, we didn't buy expensive bags or shoes, we didn't go on vacations...we skimped and saved and busted our butts working towards what we wanted, and it paid off. We live an amazingly blessed life because we knew what we wanted and had the courage to sacrifice and work for it. 
Most of the people that we grew up with are stuck in that cycle of paycheck to paycheck and unhappiness because they didn't have that same courage to sacrifice and chase their dreams. 

So here's the hard question....here's what I want you to ask yourselves,
What are you REALLY willing to sacrifice to make your dreams come true? 

Decide what you want. Decide what you're willing to sacrifice for it. Establish your priorities and go for it because there is no way any of us were born to just pay bills and die. 

Xo, Jeanice. 


Red, white, and blueberry;Patriotic pancakes.

Monday, July 4, 2016

Happy 4th, guys!!

I wanted to share a quick and easy breakfast idea to help kick off the holiday.
This patriotic pancake stack is equally gorgeous and delicious, the perfect breakfast to get you going.


I mean, they're really just regular pancakes with fruit and whipped cream but patriotic pancakes just sound so much special right?


These aren't homemade pancakes or anything, I used Bisquick instant pancake mix and store-bought whipped cream because these were really last minute but lets be honest, homemade whipped cream would've made these 100x's better......next time.....next time.

Anyyyywayyy.....All you do is make your pancakes (duh) and stack. In between each stack spread a little whipped cream and add your fruit then sprinkle with a little powdered sugar.

Serve immediately or keep in the fridge for a few hours. ( the bananas will turn brown over time and won't look as pretty but will still be delicious.)
Have a happy and safe 4th of July!
Xo, Jeanice. 


CopyRight © | Theme Designed By Hello Manhattan