Slider

Natural kids hairstyle: Braided bun with twisted bang.

Thursday, October 1, 2015


Happy October guys!!

October is Jordyns birth month.
It is also breast cancer awareness month. I had a talk with Jordyn about breast cancer and why months like this that are all about spreading awareness are important because although she doesn't have boobies yet, she eventually will.....ohhh, I cringe at the thought. UGH!!


For this bun we used:
WATER
4 bobby pins. 
A bun maker.
2 pony tail holders.
A wide tooth comb.


We started by spraying the hair with water and detangling spray. Finger combed through and then used a wide tooth comb to finish detangling. 
I split her hair in half and clipped it out of the way.
I then split the bottom half of her hair in 2 sections and loosely braided the two sections upward, securing with a pony tail holder.


I sectioned part of the top hair portion for the bang and flat twisted it down towards the front of her head. 
I applied the styling custard to the sides of her hair and brushed and pulled the hair back into the pony tail. 
We used our bun maker to create the bun and then loosely pulled the twisted bang up and back to meet the bun, allowing it to fluff out a bit and secured with a bobby pin. 

We finished off by adding the bow. 

Jordyns breast cancer awareness bow is from CHIC CACHE boutique here in Vegas. 


Peace and Love,
Jeanice 

Caramel apple dippers.

Tuesday, September 29, 2015


Jordyn brought home straight A's and all E's on her progress report so of course we celebrated by making something together.

 It needed to be quick and easy because we still have a bunch to get done today.


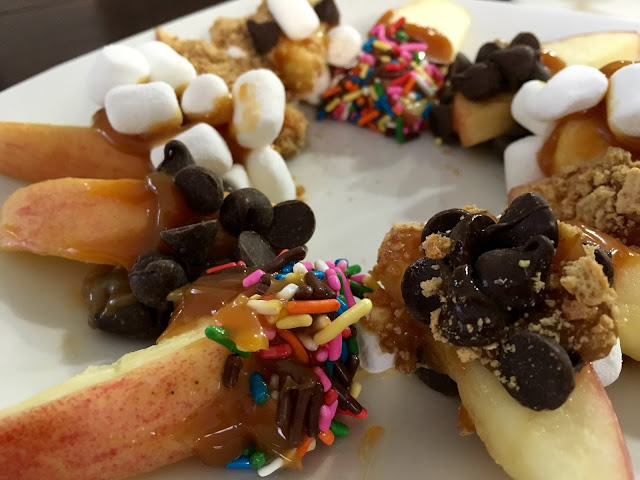
We went with caramel apple dippers. These were so fun and simple to make. Jordyn had a blast getting messy with the caramel.


All you wanna do is slice up some apples, grab some caramel dip and your favorite toppings and dip away. 
We used:
rainbow sprinkles, marshmallows, chocolate chips, graham crackers, and sugar crystal sprinkles.


 After we dipped them we just popped them in the fridge and will have them for dessert after dinner. 

Peace and Love,
Xo, Jeanice :)

Natural kids styles: Twisted undo


We've been trying to figure out a cute style for picture day. 
This morning I played in Jordyns hair and came up with a side twisted updo. I'm using less styling products and more moisturizing products while doing her hair these days so for this style I used:

MISS JESSIES LEAVE-IN CONDISH.
MISS JESSIES BABY BUTTERMILK.
COCONUT OIL.
WATER.

You'll also need:
1 PONYTAIL HOLDER. 
4 BOBBY PINS.
A WIDE TOOTH COMB.
A BOW OR ANY ACCESSORY. (OPTIONAL)


I started by spraying Jordyns hair with water, applying the leave in and making sure Jordyns hair was thoroughly combed through and free of knots and tangles. 


I then sectioned off the front bang portion of her hair and clipped it aside. 


I then proceeded to spray her hair with water and apply the products using the LOC method. 
After her hair was well moisturized I flat twisted the hair into a side ponytail at the top of her head. 


I unclipped the bang portion and flat twisted the hair towards the front of her head. I then pulled the bangs upward and back, wrapping them around the pony, making sure all the ends of her hair were tucked in, and securing with bobby pins. 


We added a bow to the backside of the updo and that was it!

The whole process took about 15 minutes this morning. 

I'm really loving this and I think this will be the winner for picture day tomorrow!

Peace and Love,
Xo, Jeanice


Banana Pudding.

Tuesday, September 22, 2015

Banana pudding is one of those desserts that I don't really make very often but when I do, I remember how freaking delicious it is. 


I'm a big sight eater. 
I love when things look as wonderful as they taste which is why I love using this recipe for my banana pudding. 
It just looks so gorgeous.

The recipe I use is the Not Yo' Mama's Banana Pudding recipe by PAULA DEEN

You'll need:

6-8 sliced bananas
2 bags Pepperidge Farm Chessman cookies
1 14 ounce can sweetened condensed milk.
1 8oz packaged of cream cheese, softened.
1 5 ounce box of instant pudding mix. ( the recipe calls for french vanilla but all we had was vanilla so we went with it.)
1 12 ounce container of cool whip, thawed.


What you do. 
Line the bottom of a 13 by 9 by 2-inch dish with 1 bag of cookies and layer bananas on top.

In a bowl, combine the milk and pudding mix and blend well using a handheld electric mixer. Using another bowl, combine the cream cheese and condensed milk together and mix until smooth. Fold the whipped topping into the cream cheese mixture. Add the cream cheese mixture to the pudding mixture and stir until well blended. Pour the mixture over the cookies and bananas and cover with the remaining cookies. Refrigerate until ready to serve.
Read more at: Foodnetwork.com


I like to have layers to my pudding. So we do cookies, bananas, pudding. Cookies, bananas, pudding. Cookies, banana, pudding. 
Crushed cookies on top and then top and whole cookies on top of the crushed ones. 


This is such a delicious dessert but its  one of those "once in a while" things just because of the not so healthy ingredients. 

But, we all deserve a little indulgence once in a while so whip yourself some up and enjoy ;)

Peace and Love.
Xo, Jeanice.

Natural kids styles: Heart pony.

Monday, September 21, 2015

Happy Monday!!

Today I wanted to share this cute style I came across on Pinterest. 
The style was done on a little girl with straight hair but I made some adjustments and made it work for Jordyns thick curls.


I was worried people wouldn't be able to tell it was a heart but at school drop off today , we got a lot of compliments on it. 


For this style I used


COCONUT OIL

BOBBY PINS

WATER

A WIDE TOOTH COMB

AND 2 HAIR TIES


I started by spraying the hair with water and applying the leave in and coconut oil. I then followed that up with the Baby Buttercreme.


For the parts, I made sure the hair was thoroughly combed out so there wasn't any snags. I made the curved parts in one swoop. The hair being combed out and free of tangles made this part very easy. 


I loosely flat twisted the front two sections towards the back and pulled everything into a low pony. I wrapped the twist around the pony and secured with bobby pins. 


I love how this style came out. Very quick and easy.


Have a great Monday!

Peace and Love,

Xo, Jeanice 

Prepping and organizing for the school week.

Sunday, September 20, 2015

Happy Sunday!

Today i'm sharing how we I get Jordyn organized and ready for the upcoming school week. 

My Sunday prep for her starts Sunday morning. Since I work Sunday nights I like to get this all prepared and ready so that i'm not scrambling Monday morning.

I start with laundry and outfit planning. 

I make sure her laundry is cleaned and she puts it away. 

I then check the weather and plan out her weekly outfits accordingly. 


I also plan her outfits based on what activity she will be doing each day ( PE days, art days etc)


I keep all of her hair accessories hanging on the back of her door using a shoe organizer. This allows us to easily pick out a bow or headband based on what she's wearing. 


I then clean out her backpack. Anything that was sent home on Friday gets cleaned out and any papers that need to be signed and returned go into her folder. 


One of the things I hate most is scrambling for hair supplies in the morning. We keep everything that is used daily for Jordyns hair in this caboodle that we got from Lowes.
 On Sundays I simply go through the caddy and make sure everything is in there. If I happen to notice that we are running low on something or say, we are out of bobby pins, I jot it down and pick it up on my way home from work Sunday night. 


Lastly, meals for the week are planned out. I make lists of what she is having for lunch along with what we are having for dinner. I check the fridge and pantry and jot down what we might need. Since we buy preservative free meats and cheeses, and always buy fresh fruit for her lunch, those things are pretty much always on the list. I go to the grocery store on Sunday nights when I get off of work. I also wash pre-slice any fruits or veggies she will be eating that week.

These meal planners and grocery list printables are from  HELLOCUTENESS

And that is pretty much it! I knock this out first thing in the mornings on Sundays and then spend a few hours with my family before heading to work. 

How do you all prep for your upcoming weeks?

Plan with me: DIY life binder

Saturday, September 19, 2015

Hi all!
Today I wanted to share with you all my life binder.  


The binder itself is from Target. It's one of those smaller ones so it fits perfectly in my purse. 


 The dividers and pages are all from the Target dollar spot. They were 3 dollars a pack.
The gold lined divider labels are  from a Heidi Swapp pack that I bought a while ago. 

I used large MAMBI sticks ( Me And My BIG Ideas) on the front pages. 

On the back of the first page, which is actually a pocket divider, I created a little dashboard. I just put sticky notes and paper clips for if I happen to come across something or have an idea and don't want to forget. All the sticky notes are from Target. As well as the page flags. The paper clips are from Dollar Tree.


The first section in my life binder is goals. And I did blur out what is written because some of these are really personal. I like to create small goals for myself as well as long term goals. 

The next section is my workout section. My workouts are very simple, very basic. I'm pretty active and i'm not looking to lose any weight so I just focus on staying in shape and giving my body the love it deserves.

This next section is my meal tracker. This section is super important to me because sometimes, I will be so busy and I will forget to eat. You can see that I didn't eat lunch this day and really I only had a handful of popcorn. I'm trying to be more consistent with my meals so this is a really big help. I printed this meal tracker from THIRTY HANDMADE DAYS

The next section is my serve section and i've actually split this section into 3 smaller sections.

Donate; here I keep all the information on what i'm donating and when. I keep track of how much I spend on items that i've purchased for donation as well.


Next is volunteer. I keep track of where i'm volunteering and when. 

Then I have Random acts of kindness. Sometimes I am out and have an idea but can't do it right away so I like to write it down so that I can come back to it later. I also keep track of any monies spent for these acts.

 The next section is Nurture. Again, I have this section split into 2 smaller sections for family and friends. I have to consciously remind myself how important it is to nurture the relationships with the people in my life and to always make time for them.


The last section in my life binder is Gratitude. Here I take time to write every night what i'm grateful for. It helps to keep me looking at the positive things rather than negative.


Do you guys keep a life binder? What is inside of yours?

Peace and Love,
Xo, Jeanice
CopyRight © | Theme Designed By Hello Manhattan